

Pantry Organization Before and After Ideas That Work
Last Updated: October 26, 2026
Quick Summary
Successful pantry organization before and after ideas follow a repeatable seven-step workflow: empty, sort, clean, measure, plan, organize, and maintain. The visible change is visibility and access, not decoration, with daily items moved to eye level and clear containers and labels letting you see what you have.
- Empty everything onto the counter and group similar items as you go, tossing what's expired.
- Measure shelf depth, height, and clearance before buying any containers or bins.
- Set four zones: daily at eye level, cooking near prep, bulk on the floor, occasional up high.
- Repurpose glass jars, boxes, and binder clips free before spending on organizers.
- Do a fifteen-minute monthly reset to keep the after photo accurate.
Table of Contents
- What a Real Pantry Transformation Looks Like Before and After
- Small Pantry Organization Ideas for Tight Spaces
- Pantry Organization Ideas on a Budget
- Choosing Pantry Storage Containers That Actually Fit
- How to Set Up Pantry Zones for Daily Use
- Food Safety and Storage Conditions Most Pantry Guides Skip
- A Maintenance Routine That Keeps the After Looking Like the After
- Start Your Pantry Refresh With Containers That Fit
- Frequently Asked Questions
What a Real Pantry Transformation Looks Like Before and After
Most pantry organization before and after ideas look the same on the surface: messy shelf, tidy shelf. The difference that matters is what changed underneath.
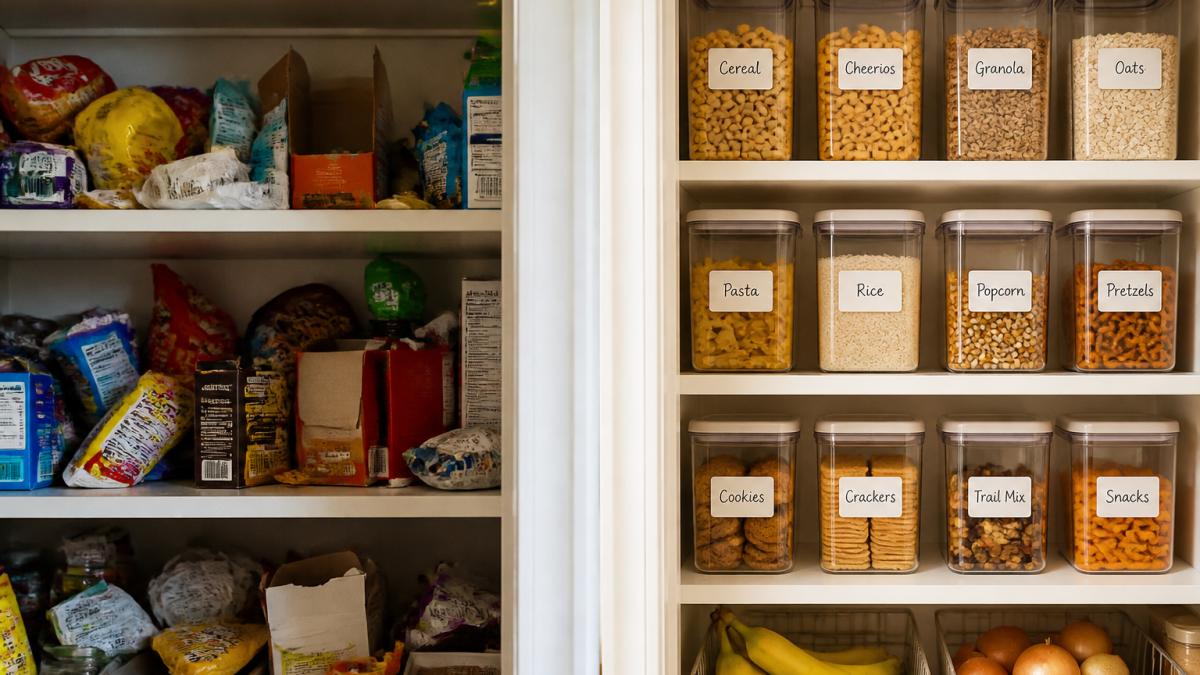
The before photo is predictable. Open bags of cereal, half-empty boxes, snacks stacked two deep, and paper towels wedged wherever they fit. The after photo is calmer: clear containers, labels, and a spot for everything.
The Before: What Most Pantries Have in Common
Nearly every cluttered pantry shares the same root problem: no system, just accumulation. Cardboard boxes half-open. Snacks pushed to the back. Duplicates hidden behind duplicates.
The fix starts with emptying everything onto the counter. Group similar items as you go. Toss what's expired. This one step does more than any container purchase.
The After: What Changes First
The first visible change is usually visibility. Clear containers and labels let you see what you have without digging. The second change is access: daily items move to eye level, bulk items drop to the floor.
That's the real before-and-after story. Not decoration. Access.
The Seven-Step Workflow Behind Every Good Before-and-After
Inspiration photos skip the part that actually gets you from before to after. Here is the sequence most professional organizers follow, adapted for a home pantry:
- Empty completely. Take everything out of the pantry, shelf by shelf. Work in sections if the pantry is large so the kitchen doesn't become unusable.
- Sort into categories. As you empty, group like with like: baking, snacks, pasta and grains, canned goods, paper goods, appliances. Keep a trash bag and a donation box nearby.
- Clean and inspect. Wipe shelves, check for moisture or pests, and let shelves dry fully before putting anything back. This is also the moment to note damaged shelf liners or loose brackets.
- Measure the space. Record depth, height, and clearance for each shelf. Note door swing and any obstructions like outlets or vents. Measurements come before purchases, not after.
- Plan zones on paper. Sketch where each category will live based on how often you use it. Daily items at eye level, heavy bulk items low, occasional items high.
- Organize with what fits. Choose containers and bins that match your measurements and your categories. Repurpose what you already own first; buy only what solves a specific fit or access problem.
- Maintain with a routine. Set a monthly reset and a first-in-first-out rule so the after photo stays accurate.
What Changes Between the Before and After Photos
A useful before-and-after comparison isn't about aesthetics. Look for these specific shifts:
- Duplicates consolidated. Three open boxes of the same cereal become one clearly labeled container.
- Vertical space used. Stackable jars and shelf risers turn dead air above cans into usable storage.
- Daily items moved to eye level. The items you reach for every morning no longer require a step stool or a deep dig.
That's the real before-and-after story. Not decoration. A workflow you can repeat when the pantry drifts back toward clutter.
Small Pantry Organization Ideas for Tight Spaces
A cramped pantry rewards vertical space over floor space. Stack upward, not outward. Use the full height of every shelf with stackable bins and jars, and keep the floor clear for larger items like bulk bags and paper towels.
For tighter setups, try these:
- Stack clear jars two high on shelves
- Hang a small rack inside the door for spices
- Use slim bins to fill dead shelf corners
If your space is genuinely tiny, here's a step-by-step method for organizing a small apartment kitchen that pairs well with any pantry plan.
Pantry Organization Ideas on a Budget
You don't need a full pantry makeover to see a difference. The most useful budget framework is to sort solutions into three tiers, free, low-cost, and higher-cost, and only move up a tier when the cheaper option fails to solve a specific problem.
Tier 1: Free (Repurpose What You Already Own)
Start here before spending anything. Most pantries already contain usable organizers.
- Wash and reuse glass jars for dry goods. Pasta, rice, oats, and cereal all store well in clean, dry jars with tight lids.
- Use cardboard boxes as drawer dividers or shelf dividers. Cut them to height and wrap with contact paper if you want a cleaner look.
- Group snacks in existing bins, baskets, or even sturdy shoeboxes.
A common pattern among zero-cost pantry reorganizations is that the sorting and grouping step does most of the work. Containers mostly protect the system you already built.
Tier 2: Low-Cost (Under a Modest Budget)
Once the free options are exhausted, a small spend can solve specific fit and visibility problems.
- Clear stackable jars in a few sizes to consolidate open bags of pasta, rice, and cereal.
- Slim bins to fill dead shelf corners and keep like items together.
- Shelf risers to create a second level for cans and jars.
Buy in stages. Start with the category that causes the most daily friction, usually snacks or cooking staples, and expand only after the first stage proves it works.
Tier 3: Higher-Cost (When Fit and Durability Matter)
Higher-cost solutions make sense when you need airtight seals, exact dimensions, or containers that will survive daily handling for years.
- Airtight container sets with matched sizes for shelf depth and height.
- Pull-out drawers or sliding baskets for deep shelves where reaching the back is the main problem.
- Custom shelf dividers or a full shelving insert for awkward spaces.
A Simple Budget Decision Rule
Before buying any organizer, ask three questions:
- Does this solve a problem I can name, visibility, access, fit, or sealing?
- Could I solve the same problem with something I already own?
- Does it fit the measurements I recorded during the planning step?
If the answer to the first question is vague, skip the purchase. If the answer to the second is yes, try the free option first. If the answer to the third is no, keep looking.
Multipurpose Food Storage Containers Set - Clear Jars with Lids for Cereal →
One pantry owner reorganized a full pantry in about three hours with zero spend, according to Apartment Therapy's zero-cost pantry reorganization story. Another reported a two-day project for just over $400, per a community before-and-after pantry post. Both ended in a working system. Only one cost money.
Choosing Pantry Storage Containers That Actually Fit
The right pantry storage containers match your shelf depth, your shelf height, and how often you restock. Buy for fit first, looks second. A beautiful jar that doesn't stack wastes shelf space.
Our Multipurpose Food Storage Containers Set offers clear jars in five sizes, from 460ml up to 1900ml, so you can match container size to shelf depth. The airtight seal keeps cereal, pasta, and snacks fresh, and the stackable design uses vertical space instead of eating it.
Before you buy any set, compare options carefully with a focused airtight container buying guide.
Measuring Shelf Depth and Height Before You Buy
Measure before you spend. Grab a tape and note three numbers per shelf: depth, height, and clearance above.
Then check the jar dimensions against those numbers. Our 1900ml jar, for example, stands 26cm tall. If your shelf clearance is 24cm, it won't fit upright. Measure first, buy second.
| Container Size | Best For | Fits Where |
|---|---|---|
| 460ml | Spices, candy | Shallow shelves |
| 600ml | Snacks, small dry goods | Standard shelves |
| 900ml | Coffee, sugar | Standard shelves |
| 1300ml | Pasta, rice | Taller shelves |
| 1900ml | Cereal, bulk dry goods | Deep, tall shelves |
How to Set Up Pantry Zones for Daily Use
Pantry zones are simple: put the things you reach for most at eye level, and the things you reach for least down low or up high. That's the whole idea. Zones cut the daily digging that turns a tidy pantry back into a mess.
Set up four basic zones:
- Daily: cereal, coffee, snacks at eye level
- Cooking: pasta, rice, spices near prep space
- Bulk: large bags and backup stock on the floor
Keep lunch boxes and paper towels in their own spot so they stop drifting across shelves.
Food Safety and Storage Conditions Most Pantry Guides Skip
Dry goods stay fresh longer when you control three things: moisture, heat, and air. Airtight containers help with moisture and air. Placement handles heat.
Keep the pantry away from the oven and out of direct sun. Store flour, rice, and cereal in sealed containers, not open bags.
For a deeper look at keeping staples fresh, read our guide on how to keep pantry staples fresh.
A Maintenance Routine That Keeps the After Looking Like the After
The "after" photo lasts about two weeks without a routine. Maintenance is the step almost every pantry guide skips, and it's the one that decides whether your system survives.
A simple monthly reset works:
- Pull expired items and toss them
- Wipe shelves and check for moisture
- Refill containers and note what's low
Fifteen minutes a month is enough. Do it on the same day each month so it becomes habit, not a project.
Start Your Pantry Refresh With Containers That Fit
The gap between a cluttered pantry and a calm one is rarely money. It's a plan: sort first, measure second, buy third.
DecorGlore builds containers for exactly that plan. Our jars are BPA-free, stackable, and sealed to keep dry goods fresh.
Ready to make your before-and-after real? Shop the Multipurpose Food Storage Containers Set and build a pantry that stays organized.

Frequently Asked Questions
What are the 7 pantry zones?
Most organized pantries split into seven working zones: baking, cooking and oils, dry goods like rice and pasta, snacks, breakfast and cereal, beverages, and paper goods or cleaning supplies kept on the lowest shelf. Grouping by zone rather than by package size means you reach for everything for one task in one place. Label each shelf so the rest of the household keeps it that way, and review the zones every few months as your shopping habits change.
What containers are best for pantry organization?
Clear, stackable containers with seal-tight lids work best because you can see what is running low without opening anything. Look for a wide opening for scooping, moisture-proof lids, and a size range that matches your shelf depth. DecorGlore's multipurpose food storage containers come in five sizes from 460ml to 1900ml, all with a clear body and sealing strip, so you can match tall jars to cereal and short jars to spices on the same shelf.
How do you organize a small pantry with limited shelf space?
Go vertical first: stack containers rather than lining them side by side, and use the full shelf height with a second tier where it fits. Measure shelf depth before buying anything, because a deep shelf wastes space if containers are shallow. Move bulky or rarely used items to floor baskets, keep daily items at eye level, and reserve the top shelf for lightweight backups. Clear containers help here too, since you stop buying duplicates you already own.
How can you make a pantry look organized on a budget?
Start with a full declutter and check expiration dates before spending anything. One Apartment Therapy pantry redo was completed in three hours with no money spent at all. After that, decant into containers gradually rather than all at once, reuse boxes and baskets you already own, and add labels to what you have. A Facebook group poster spent just over $400 and two days on a full pantry project, which shows the range: the look comes from grouping and labels, not from spending.
Your pantry won't organize itself, but it doesn't have to stay a mess. DecorGlore's airtight, stackable, BPA-free containers give you the visibility and access a working pantry needs. Get started with DecorGlore and turn your cluttered shelves into a system you can keep.
